

One of the most common questions that I get from new photographers looking to start their business off right, is “Where do I start and what do I buy?” So today I thought I’d share three of my top tips for new photographers!
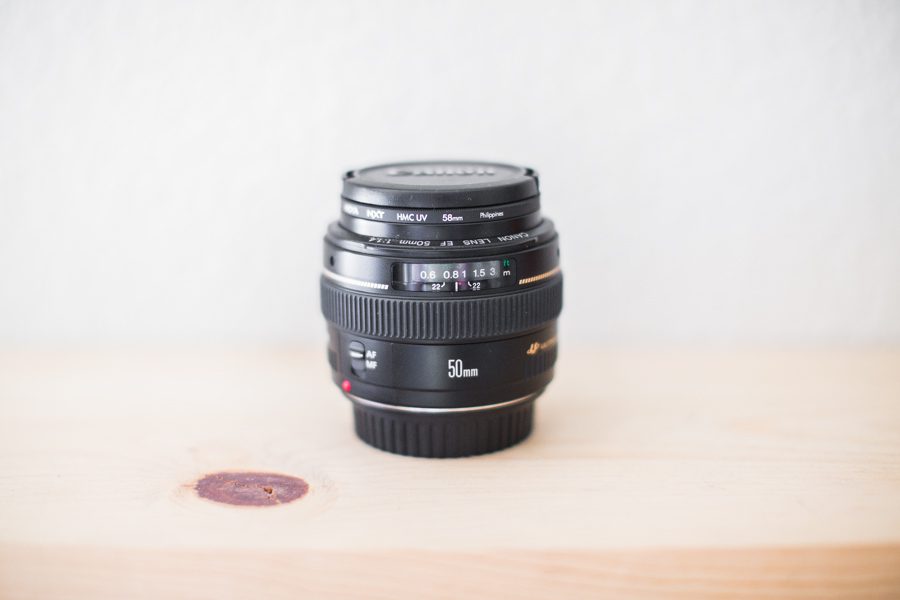
1. Invest in a quality prime lens. A prime lens has a fixed focal length, meaning it does not zoom in and out. I prefer prime lenses to those that zoom because I don’t have to change my settings as often and I like to move with my lens instead of letting my lens do all the work (that will make more sense to you once you shoot with a prime lens). The lens your camera comes with is called a “kit lens,” often an 18-55mm f/5.6 lens. And while this isn’t a horrible lens, it won’t fully allow you to explore the capabilities of your camera because you’ll be limited to smaller apertures (the feature that allows for a more shallow depth of field) and in my experience the 18-55mm lens felt extremely non versatile. The very first lens that I purchased was the 50 mm f/1.4 and after doing so I felt like a completely different photographer. The quality of my images were incredible and I was able to get more use out of my first camera body since I had wider apertures to play with (e.g. f/ 2.8, f/1.4). In contrast to my kit lens, I found the 50mm lens to be extremely versatile, and to this day it’s still one of my go-to lenses for any number of situations! I even shot my very first wedding exclusively with the 50 1.4, I don’t actually recommend doing that, but if nothing else proves the versatility.
If the 50mm f/1.4 is out of your budget there is also a more budget-friendly alternative and that’s the 50mm f/1.8 coming in just over $100. (Click underlined words for link to buy)
2. Use professional editing software. I too, like many of you, started my photography business by editing images in iPhoto on my macbook. This serves as a great starting place and it’s wonderful that Apple offers consumer editing software. However, you’re looking to be a professional so you should be investing in professional editing software. I know, at this point in the blog post you’re asking me “Why why why!?” “More money?!” Once again, I too put my palm to forehead when photographers above me told me I needed to spend more money, but in the long run this changed the way my images looked and offered an entirely more productive workflow. There are some super affordable editing programs and my all-time favorite is Lightroom! I hardly even bother to use Photoshop but to make very minor adjustments. You can find older versions of Lightroom on Amazon for just $95! (Click underlined words for link to buy)

3. Start a Blog and a Social Media Presence. We live in an online age so it’s very important you begin maintaining an online presence. With free marketing tools like Facebook, Instagram, and Twitter I think it goes with out saying that you should be interacting on each format. If you feel more confident and are drawn more to a specific social media outlet then put your focus there, for example I interact best on Instagram so my energy is put there more than Twitter. But it’s still important to have some type of presence on each social media platform because you never know where your next client will find you! It’s also important to secure your business name on these sites because hundreds of new accounts are created daily, and you want to lock in your business name before someone else takes it! I learned that the hard way on Twitter (hello @nictakespics instead of @nicoledianne…sad day).
Your blog doesn’t need to be anything fancy, it just needs to be a place where people can search your name and see a bit of your portfolio. If writing isn’t your thing, that’s okay, treat your blog like a website and create gallery pages for potential clients to click through. Blogger and WordPress are two places where you can start a basic, free blog. Below is a screenshot of my very first blog, and to this day I maintain a similar aesthetic using clean lines, a white background and black & white fonts. Allow your images to do the talking and keep it simple!

I hope you’ve found these three tips to be helpful in your pursuit of starting a photography business, or even if you’re just a hobbyist! If you have any questions at all feel free to leave them in the comments below and I’ll reply directly in the comment!
Good luck and go get’m tiger ;)
KarisLove these tips! What other lenses would you suggest for shooting weddings?
nicoleGlad you found the tips helpful! I would suggest having a macro/zoom lens for ceremony pictures (70-200 or 135), a portrait lens for details and portraits (50 or 85), and some type of wide angle lens for family pictures and the reception (35). Those are fairly standard wedding lenses that will get you through any wedding! Maybe I’ll write a more in depth post on that question in the future!